How to Make Hairpin Lace

The popularity of hairpin lace has ebbed and flowed since Victorian times. It's a gorgeous, simple, crochet method that works up fast and produces beautiful results with today's yarns. There are many ways to make and join hairpin lace. This tutorial is intended to introduce you to the technique, how to make a basic strip, and how to join it to other strips.
Hairpin lace was originally created on U-shaped hair pins and then metal U-shaped looms, but now days there are several models of hairpin lace looms which can create varying widths of lace.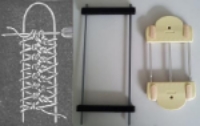
The lace is formed by wrapping yarn or thread around the left and right tines of the loom to create loops. These loops are crocheted together up the center of the loom. You can make any desired length of lace.
The demonstration below uses the Boye Hairpin Lace Tool, worsted weight cotton yarn, and I/9/ 5.5MM hook and US crochet terms.
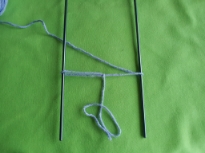
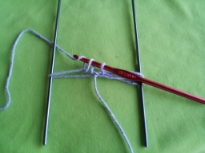
1. Start by making a long loop with a slipknot. Hook the loop over the left prong of the loom. Adjust the knot so that it is positioned in the middle between the left and right prongs. Wrap the yarn around the right prong to the back of the loom and over to the left as shown in the illustration.
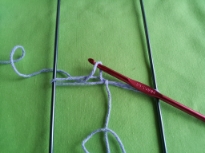
2. Insert your crochet hook under the front strand of beginning loop and pull up the working yarn to form a loop on your hook.
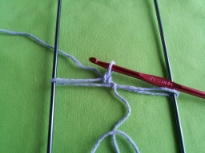
3. Yarn over and pull through the loop on the hook. (Chain stitch made.)
4. Point the crochet hook down.
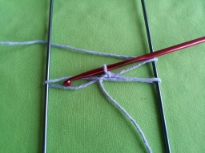
5. Flip the loop over from right to left so that the back of the work is now facing you. Rotate the hook into the working position.
6. Insert your crochet hook under the front strand of the loop on the left prong. Pull up the working yarn to form another loop on your hook. Yarn over.
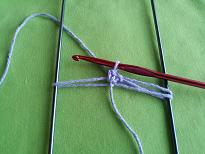
7. Pull through the two loops on the hook. (Single crochet made from here on out.)
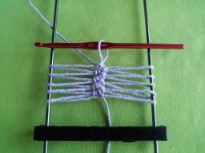
Repeat steps 5, 6, and 7 keeping the middle stitches centered. Work the required number of loops and finish off by clipping the working yarn and pulling through the last stitch worked to secure it.
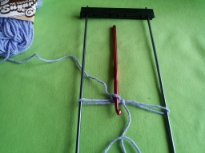
If and when the Hair Pin Lace loom is too full to comfortably work the stitches, remove the bottom clip of the loom and slide off all but two or three loops per side. Replace the clip and continue on with the strip and required number of loops and stitches.
There are many ways to join the hairpin lace strips. The simplest one for beginners is to align two finished strips (with an equal amount of loops) side by side. Using your crochet hook, connect the loops by pulling one through the other (like a chain). You can do this with single loops or in groups (ie: 2 loops at a time, 3 loops at a time, etc…)
Now that you know how to make a basic hairpin lace strip, try out your new skills by making a n elegant hairpin lace scarf pattern (the link is below).
Do you have a favorite Hairpin Crochet technique or pattern - or have any hints and tips to share? Stop by the forum and let us know!
Clover Hair Pin Lace Tool Clover Hairpin Lace Loom

Hairpin lace was originally created on U-shaped hair pins and then metal U-shaped looms, but now days there are several models of hairpin lace looms which can create varying widths of lace.
The lace is formed by wrapping yarn or thread around the left and right tines of the loom to create loops. These loops are crocheted together up the center of the loom. You can make any desired length of lace.
The demonstration below uses the Boye Hairpin Lace Tool, worsted weight cotton yarn, and I/9/ 5.5MM hook and US crochet terms.
1. Start by making a long loop with a slipknot. Hook the loop over the left prong of the loom. Adjust the knot so that it is positioned in the middle between the left and right prongs. Wrap the yarn around the right prong to the back of the loom and over to the left as shown in the illustration.
2. Insert your crochet hook under the front strand of beginning loop and pull up the working yarn to form a loop on your hook.
3. Yarn over and pull through the loop on the hook. (Chain stitch made.)
4. Point the crochet hook down.
5. Flip the loop over from right to left so that the back of the work is now facing you. Rotate the hook into the working position.
6. Insert your crochet hook under the front strand of the loop on the left prong. Pull up the working yarn to form another loop on your hook. Yarn over.
7. Pull through the two loops on the hook. (Single crochet made from here on out.)
Repeat steps 5, 6, and 7 keeping the middle stitches centered. Work the required number of loops and finish off by clipping the working yarn and pulling through the last stitch worked to secure it.
If and when the Hair Pin Lace loom is too full to comfortably work the stitches, remove the bottom clip of the loom and slide off all but two or three loops per side. Replace the clip and continue on with the strip and required number of loops and stitches.
There are many ways to join the hairpin lace strips. The simplest one for beginners is to align two finished strips (with an equal amount of loops) side by side. Using your crochet hook, connect the loops by pulling one through the other (like a chain). You can do this with single loops or in groups (ie: 2 loops at a time, 3 loops at a time, etc…)
Now that you know how to make a basic hairpin lace strip, try out your new skills by making a n elegant hairpin lace scarf pattern (the link is below).
Do you have a favorite Hairpin Crochet technique or pattern - or have any hints and tips to share? Stop by the forum and let us know!
Clover Hair Pin Lace Tool
You Should Also Read:
Elegant Hairpin Lace Scarf Pattern
Hairpin Lace Crochet

Related Articles
Editor's Picks Articles
Top Ten Articles
Previous Features
Site Map
Content copyright © 2023 by Melissa Rodriguez. All rights reserved.
This content was written by Melissa Rodriguez. If you wish to use this content in any manner, you need written permission. Contact Holly Messenger Aamot for details.