
Playing with Postcards

Last year I joined a postcard swap with women from all over the world. Each month we are given a theme and an address to send our postcard to. I received my 6 months of details at the beginning of January, and have only just managed to finish all six of them in the last week.
I had lots of fun doing these postcards. I am not an artist ( I don’t consider myself a drawer or painter), but when it comes to postcards, I seem to shake off my artistic doubts and just go for it, and it’s the most liberating thing I’ve done quilting wise, for a very long time.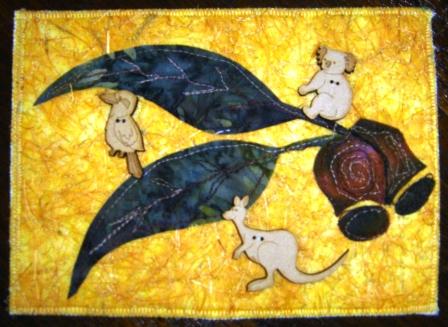
I used some different materials this time, and have found that I can create much quicker and with more fluidity. In previous attempts I’ve used very thick cardboard and have covered them with fabric then spent some painstaking hours top-sewing them together. But recently, I came across some very thick and stiff Vilene, the type that is used for stiffening bags and purses. This stuff is great!! It provides the thickness I need and also provides the batting to machine stitch through, giving the slightly puffy effect you like on the postcards.
The secret “ingredient” in this set of postcards is a fibre/fabric called “silk paper” which I purchased in a cheap shop ($5.00 shop) recently. There were 6 sheets of this fibre that really feels like a cross between fabric and paper. So I decided to use this as my base for all of the postcards, except the redwork one.

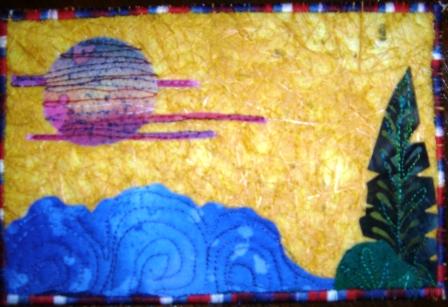
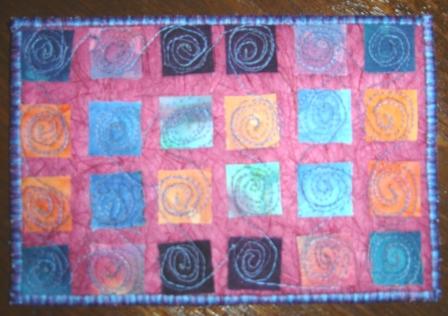
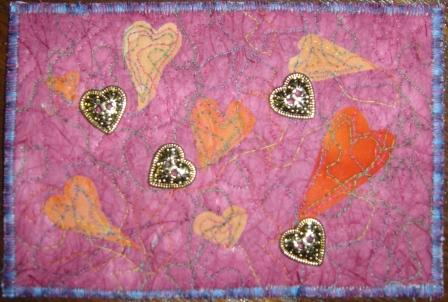
For all of the postcards (expect the redwork), I followed the same method. Firstly I bonded some fabrics to iron-on webbing and free hand cut objects I needed for the theme. For Under the sea I cut weeds; At the Beach I free-hand cut the waves, the forest and the sun; for Australiana I cut the gum leaves and gumnuts; for the Hearts I hand cut some weird heart shapes; and for the mini quilt I just cut up squares, approximately the same size from the left over fabrics that had been bonded for the other postcards.. I ironed them onto the bonding and then free motion quilted each of the postcards, using a variety of variegated threads (Superior). Once the front of the postcard was completed with free motion quilting, I used a double sided adhesive Pelon and ironed a cream homespun to the back and trimmed it with the rotary cutter.
Then I used a satin stitch to finish off around the edge of the postcard and finally, where it was needed, I hand stitched various embellishments to the postcards. I put some heart buttons on the Hearts postcard, some shells on the Under the Sea postcard, and three gorgeous animal buttons I found at the Patchwork Angel. A Kangaroo, Koala and Kookaburra finished the Australiana postcard off beautifully. With the Mini Quilt postcard, I should have beaded the front before I added the backing – will know that for next time.
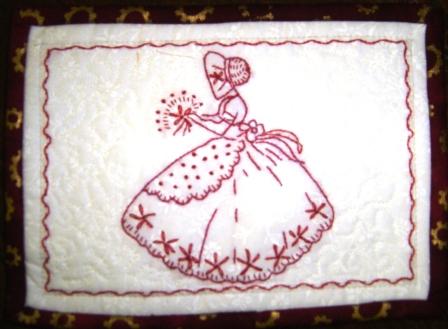
The redwork postcard was a bit tricky, but I found a very very old pattern of a lady in a crinoline so copied onto some white patterned fabrics, embroidered it (with whisper weft on the wrong side) then used binding to finish it off. I was quite please with it also.
So, that’s my recent foray with postcards. Have you tried making any yet? There’s so many websites for you to tour, I’ll pop three of these at the bottom of this article for you to peruse. Have fun!!
Art Card Ideas Gallery
Fibre Art for a Cause
Art2mail
I had lots of fun doing these postcards. I am not an artist ( I don’t consider myself a drawer or painter), but when it comes to postcards, I seem to shake off my artistic doubts and just go for it, and it’s the most liberating thing I’ve done quilting wise, for a very long time.
I used some different materials this time, and have found that I can create much quicker and with more fluidity. In previous attempts I’ve used very thick cardboard and have covered them with fabric then spent some painstaking hours top-sewing them together. But recently, I came across some very thick and stiff Vilene, the type that is used for stiffening bags and purses. This stuff is great!! It provides the thickness I need and also provides the batting to machine stitch through, giving the slightly puffy effect you like on the postcards.
The secret “ingredient” in this set of postcards is a fibre/fabric called “silk paper” which I purchased in a cheap shop ($5.00 shop) recently. There were 6 sheets of this fibre that really feels like a cross between fabric and paper. So I decided to use this as my base for all of the postcards, except the redwork one.
For all of the postcards (expect the redwork), I followed the same method. Firstly I bonded some fabrics to iron-on webbing and free hand cut objects I needed for the theme. For Under the sea I cut weeds; At the Beach I free-hand cut the waves, the forest and the sun; for Australiana I cut the gum leaves and gumnuts; for the Hearts I hand cut some weird heart shapes; and for the mini quilt I just cut up squares, approximately the same size from the left over fabrics that had been bonded for the other postcards.. I ironed them onto the bonding and then free motion quilted each of the postcards, using a variety of variegated threads (Superior). Once the front of the postcard was completed with free motion quilting, I used a double sided adhesive Pelon and ironed a cream homespun to the back and trimmed it with the rotary cutter.
Then I used a satin stitch to finish off around the edge of the postcard and finally, where it was needed, I hand stitched various embellishments to the postcards. I put some heart buttons on the Hearts postcard, some shells on the Under the Sea postcard, and three gorgeous animal buttons I found at the Patchwork Angel. A Kangaroo, Koala and Kookaburra finished the Australiana postcard off beautifully. With the Mini Quilt postcard, I should have beaded the front before I added the backing – will know that for next time.
The redwork postcard was a bit tricky, but I found a very very old pattern of a lady in a crinoline so copied onto some white patterned fabrics, embroidered it (with whisper weft on the wrong side) then used binding to finish it off. I was quite please with it also.
So, that’s my recent foray with postcards. Have you tried making any yet? There’s so many websites for you to tour, I’ll pop three of these at the bottom of this article for you to peruse. Have fun!!
Art Card Ideas Gallery
Fibre Art for a Cause
Art2mail

Related Articles
Editor's Picks Articles
Top Ten Articles
Previous Features
Site Map
Content copyright © 2023 by Judie Bellingham. All rights reserved.
This content was written by Judie Bellingham. If you wish to use this content in any manner, you need written permission. Contact Judie Bellingham for details.

